NVIDIA Network Operator Deployment Guide with OpenShift
On this page
Network Operator Deployment on an OpenShift Container Platform
Warning
It is recommended to have dedicated control plane nodes for OpenShift deployments with NVIDIA Network Operator.
Warning
Automatic DOCA-OFED Driver Upgrade doesn’t work on Single Node OpenShift (SNO) deployments.
Node Feature Discovery
To enable Node Feature Discovery, please follow the official guide. A single instance of Node Feature Discovery is expected to be used in the cluster.
An example of Node Feature Discovery configuration:
apiVersion: nfd.openshift.io/v1
kind: NodeFeatureDiscovery
metadata:
  name: nfd-instance
  namespace: openshift-nfd
spec:
  operand:
    image: registry.redhat.io/openshift4/ose-node-feature-discovery-rhel9:v4.16
    imagePullPolicy: Always
  workerConfig:
    configData: |
      sources:
        pci:
          deviceClassWhitelist:
            - "02"
            - "03"
            - "0200"
            - "0207"
          deviceLabelFields:
            - vendor
Verify that the following label is present on the nodes containing NVIDIA networking hardware: feature.node.kubernetes.io/pci-15b3.present=true
For more details please read official NFD documentation.
oc describe node | grep -E 'Roles|pci' | grep -v "control-plane"

Roles:              worker
                    cpu-feature.node.kubevirt.io/invpcid=true
                    cpu-feature.node.kubevirt.io/pcid=true
                    feature.node.kubernetes.io/pci-102b.present=true
                    feature.node.kubernetes.io/pci-10de.present=true
                    feature.node.kubernetes.io/pci-10de.sriov.capable=true
                    feature.node.kubernetes.io/pci-14e4.present=true
                    feature.node.kubernetes.io/pci-15b3.present=true
                    feature.node.kubernetes.io/pci-15b3.sriov.capable=true
SR-IOV Network Operator
If you are planning to use SR-IOV, follow these instructions to install SR-IOV Network Operator on an OpenShift Container Platform.
Warning
The SR-IOV resources created will have the openshift.io prefix.
For the default SriovOperatorConfig CR to work with the NVIDIA DOCA-OFED Driver container, please run this command to update the following values:
oc patch sriovoperatorconfig default \
  --type=merge -n openshift-sriov-network-operator \
  --patch '{ "spec": { "configDaemonNodeSelector": { "network.nvidia.com/operator.mofed.wait": "false", "node-role.kubernetes.io/worker": "", "feature.node.kubernetes.io/pci-15b3.sriov.capable": "true" } } }'
Warning
SR-IOV Network Operator configuration documentation can be found on the Official Website.
GPU Operator
If you plan to use GPUDirect, follow this to install GPU Operator on an OpenShift Container Platform.
Make sure to enable RDMA and disable useHostMofed in the driver section in the spec of the ClusterPolicy CR.
Network Operator Installation
Network Operator Installation Using OpenShift Catalog
In the OpenShift Container Platform web console side menu, select Operators > OperatorHub, and search for the NVIDIA Network Operator.
Select NVIDIA Network Operator, and click Install in the first screen and in the subsequent one.
For additional information, see the Red Hat OpenShift Container Platform Documentation.
Network Operator Installation using OpenShift OC CLI
Create a namespace for the Network Operator.
oc create namespace nvidia-network-operator
Install the Network Operator in the namespace created in the previous step by creating the below objects. Run the following command to get the channel value required for the next step:
oc get packagemanifest nvidia-network-operator -n openshift-marketplace -o jsonpath='{.status.defaultChannel}'
Example output:
stable
Create the following Subscription CR, and save the YAML in the network-operator-sub.yaml file:
apiVersion: operators.coreos.com/v1alpha1
kind: Subscription
metadata:
  name: nvidia-network-operator
  namespace: nvidia-network-operator
spec:
  channel: stable
  name: nvidia-network-operator
  source: certified-operators
  sourceNamespace: openshift-marketplace
Create the subscription object by running the following command:
oc create -f network-operator-sub.yaml
Change to the network-operator project:
oc project nvidia-network-operator
Verification
To verify that the operator deployment is successful, run:
oc get pods -n nvidia-network-operator
Example output:
NAME                                                          READY   STATUS    RESTARTS   AGE
nvidia-network-operator-controller-manager-8f8ccf45c-zgfsq    2/2     Running   0          1m
A successful deployment shows a Running status.
Network Operator Upgrade
This section describes how to upgrade the NVIDIA Network Operator on OpenShift Container Platform.
Note
Updating the NVIDIA Network Operator will not automatically update the NicClusterPolicy components. You will need to manually update the NicClusterPolicy components to the new version.
Upgrade Using OpenShift Web Console
In the OpenShift Container Platform web console side menu, select Operators > Installed Operators, and search for the NVIDIA Network Operator.
In case that the NVIDIA Network Operator has a pending update, it will display a status with Upgrade available like in the following image:
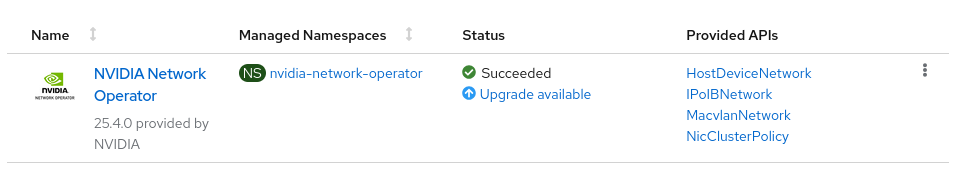
Click on the Upgrade Available link, then click Preview Install Plan button.
Review the install plan, and click Approve button to upgrade the NVIDIA Network Operator.
Navigate back to the Operators -> Installed Operators page to monitor the progress of the update. When complete, the status changes to Succeeded and Up to date.
For additional information, see the Red Hat OpenShift Container Platform Documentation upgrade guide.
Upgrade Using OpenShift OC CLI
Check the current subscription status to see if an upgrade is available:
oc get subscription nvidia-network-operator -n nvidia-network-operator -o yaml
Look for the following fields in the output:
status.state: Should show UpgradePending if an upgrade is available
status.installedCSV: Shows the currently installed version
status.currentCSV: Shows the available upgrade version
status.installPlanRef.name: The name of the install plan that requires approval
Example output:
status:
  currentCSV: nvidia-network-operator.v25.7.0
  installedCSV: nvidia-network-operator.v25.4.0
  installPlanRef:
    name: install-r4pvj
  state: UpgradePending
List the install plans to identify the pending one:
oc get installplan -n nvidia-network-operator
Example output:
NAME            CSV                               APPROVAL   APPROVED
install-lrwp2   nvidia-network-operator.v25.4.0   Manual     true
install-r4pvj   nvidia-network-operator.v25.7.0   Manual     false
Review the install plan details before approving:
oc get installplan <install-plan-name> -n nvidia-network-operator -o yaml
Replace <install-plan-name> with the name from the previous step (e.g., install-r4pvj).
Approve the install plan to proceed with the upgrade:
oc patch installplan <install-plan-name> -n nvidia-network-operator \
  --type merge --patch '{"spec":{"approved":true}}'
Monitor the upgrade progress by checking the ClusterServiceVersion:
oc get csv -n nvidia-network-operator
Wait until the new version shows PHASE: Succeeded:
NAME                              DISPLAY                   VERSION   REPLACES                          PHASE
nvidia-network-operator.v25.7.0   NVIDIA Network Operator   25.7.0    nvidia-network-operator.v25.4.0   Succeeded
Verify the operator pods are running with the new version:
oc get pods -n nvidia-network-operator
Example output:
NAME                                                          READY   STATUS    RESTARTS   AGE
nvidia-network-operator-controller-manager-8f8ccf45c-zgfsq    1/1     Running   0          2m
Note
After the upgrade is complete, remember to update the NicClusterPolicy components to match the new operator version if needed.
Using Network Operator to Create NicClusterPolicy in OpenShift Container Platform
See Deployment Examples for OCP:
Deployment Examples For OpenShift Container Platform
In OCP, some components are deployed by default like Multus and CNI Plugins, whereas others, such as NFD and SR-IOV Network Operator must be deployed manually, as described in the Installation section.
In addition, since there is no use of the Helm chart, the configuration should be done via the NicClusterPolicy CRD.
Note
In OCP, Multus is configured with namespaceIsolation enabled by default. This means that Pods using secondary networks should be deployed in the same namespace as the network-attachment-definition CR unless the NAD is in one of the following namespaces: default, openshift-multus, openshift-sriov-network-operator and openshift-cnv. The namespace of the NAD can be set in the networkNamespace field in HostDeviceNetwork, MacvlanNetwork, IPoIBNetwork, OVSNetwork and SriovNetwork.
Following are examples of NicClusterPolicy configuration for OCP.
Network Operator Deployment with a Host Device Network - OCP
Network Operator deployment with:
SR-IOV device plugin, single SR-IOV resource pool:
There is no need for a secondary network configuration, as it is installed by default in OCP.
apiVersion: mellanox.com/v1alpha1
kind: NicClusterPolicy
metadata:
  name: nic-cluster-policy
spec:
  ofedDriver:
    image: doca-driver
    repository: nvcr.io/nvstaging/mellanox
    version: doca3.2.0-25.10-1.2.8.0-0
     startupProbe:
      initialDelaySeconds: 10
      periodSeconds: 20
    livenessProbe:
      initialDelaySeconds: 30
      periodSeconds: 30
    readinessProbe:
      initialDelaySeconds: 10
      periodSeconds: 30
  sriovDevicePlugin:
      image: sriov-network-device-plugin
      repository: nvcr.io/nvstaging/mellanox
      version: network-operator-v25.10.0-rc.1
      config: |
        {
          "resourceList": [
              {
                  "resourcePrefix": "nvidia.com",
                  "resourceName": "hostdev",
                  "selectors": {
                      "vendors": ["15b3"],
                      "isRdma": true
                  }
              }
          ]
        }
  nvIpam:
    image: nvidia-k8s-ipam
    repository: nvcr.io/nvstaging/mellanox
    version: network-operator-v25.10.0-rc.1
    imagePullSecrets: []
    enableWebhook: false
Following the deployment, the Network Operator should be configured, and K8s networking deployed to use it in pod configuration.
To create an NV-IPAM IPPool, apply:
apiVersion: nv-ipam.nvidia.com/v1alpha1
kind: IPPool
metadata:
  name: my-pool
spec:
  subnet: 192.168.0.0/24
  perNodeBlockSize: 100
  gateway: 192.168.0.1
The host-device-net.yaml` configuration file for such a deployment:
apiVersion: mellanox.com/v1alpha1
kind: HostDeviceNetwork
metadata:
  name: hostdev-net
spec:
  networkNamespace: "default"
  resourceName: "hostdev"
  ipam: |
    {
       "type": "nv-ipam",
       "poolName": "my-pool"
    }
The pod.yaml configuration file for such a deployment:
apiVersion: v1
kind: Pod
metadata:
  name: hostdev-test-pod
  annotations:
    k8s.v1.cni.cncf.io/networks: hostdev-net
spec:
  restartPolicy: OnFailure
  containers:
  - image: <rdma image>
    name: doca-test-ctr
    securityContext:
      capabilities:
        add: [ "IPC_LOCK" ]
    resources:
      requests:
        nvidia.com/hostdev: 1
      limits:
        nvidia.com/hostdev: 1
    command:
    - sh
    - -c
    - sleep inf
Network Operator Deployment with SR-IOV Legacy Mode - OCP
This deployment mode supports SR-IOV in legacy mode. Note that the SR-IOV Network Operator is required as described in the Deployment for OCP section.
apiVersion: mellanox.com/v1alpha1
kind: NicClusterPolicy
metadata:
  name: nic-cluster-policy
spec:
  ofedDriver:
    image: doca-driver
    repository: nvcr.io/nvstaging/mellanox
    version: doca3.2.0-25.10-1.2.8.0-0
     startupProbe:
      initialDelaySeconds: 10
      periodSeconds: 20
    livenessProbe:
      initialDelaySeconds: 30
      periodSeconds: 30
    readinessProbe:
      initialDelaySeconds: 10
      periodSeconds: 30
  nvIpam:
    image: nvidia-k8s-ipam
    repository: nvcr.io/nvstaging/mellanox
    version: network-operator-v25.10.0-rc.1
    imagePullSecrets: []
    enableWebhook: false
SriovNetworkNodePolicy and K8s networking should be deployed.
NV-IPAM IPPool should be created before SriovNetwork:
apiVersion: nv-ipam.nvidia.com/v1alpha1
kind: IPPool
metadata:
  name: my-pool
  namespace: openshift-sriov-network-operator
spec:
  subnet: 192.168.0.0/24
  perNodeBlockSize: 100
  gateway: 192.168.0.1
sriovnetwork-node-policy.yaml configuration file for such a deployment:
apiVersion: sriovnetwork.openshift.io/v1
kind: SriovNetworkNodePolicy
metadata:
  name: policy-1
  namespace:  openshift-sriov-network-operator
spec:
  deviceType: netdevice
  mtu: 1500
  nicSelector:
    vendor: "15b3"
    pfNames: ["ens2f0"]
  nodeSelector:
    feature.node.kubernetes.io/pci-15b3.present: "true"
  numVfs: 8
  priority: 90
  isRdma: true
  resourceName: sriovlegacy
The sriovnetwork.yaml configuration file for such a deployment:
apiVersion: sriovnetwork.openshift.io/v1
kind: SriovNetwork
metadata:
  name: sriov-network
  namespace:  openshift-sriov-network-operator
spec:
  vlan: 0
  networkNamespace: "default"
  resourceName: "sriovlegacy"
  ipam: |
    {
       "type": "nv-ipam",
       "poolName": "my-pool"
    }
Note that the resource prefix in this case will be openshift.io. The pod.yaml configuration file for such a deployment:
apiVersion: v1
kind: Pod
metadata:
  name: testpod1
  annotations:
    k8s.v1.cni.cncf.io/networks: sriov-network
spec:
  containers:
  - name: appcntr1
    image: <image>
    imagePullPolicy: IfNotPresent
    securityContext:
      capabilities:
        add: ["IPC_LOCK"]
    command:
      - sh
      - -c
      - sleep inf
    resources:
      requests:
        openshift.io/sriovlegacy: '1'
      limits:
        openshift.io/sriovlegacy: '1'
Network Operator Deployment for DPDK Workloads - OCP
In order to configure HUGEPAGES in OpenShift, refer to this steps.
For SR-IOV Network Operator configuration instructions, visit the Official Website.